|
LOGIN PROCEDURE FOR INTERNET USERS
* Before you will be able to use this service you will need to contact the Quick Business Service Department for your password and user name.
- Once you are connected to our online system, you will get a login prompt saying,
“SCO OpenServer(TM) Release 5 (mercury2.qms-dc.com) (ttyp2)”
login:
- Enter ____________ at the login prompt. (Use lower case).
- Enter ____________ at the password prompt. (Use lower case).
- You will then see the following message:
NOTE: If at any time while you are placing an order you want to go backwards, use the Up Arrow key [^]. If you want to advance, press enter.
The Order Entry Screen looks like this.
Fill this form in with your information using the instructions below.
ORDER ENTRY
- Enter Caller name (Enter) or press enter if name is preregistered.
- Enter Reference code (if applicable) (Enter).
- (P)ickup (D)elivery (O)ther
- (D)elivery – A delivery leaving your location (automatic default).
- (P)ickup – A delivery coming back to your location.
- (O)ther – A pickup somewhere other than your location, going somewhere other than your location, but charging your account.
- Once you have selected one of the above, you fill in the company name it’s being picked up from or delivered to or choose from the rolodex feature (see ADDRESS ENTRY).
- Enter the Street Number. (In the case of a Building name, you can enter the room number instead).
- (Local Deliveries)Enter the Street Name or name of the Building (i.e.. General Hospital). Enter the first four or five letters of the street name and press either PF2 or F2 (depending on your keyboard). This will pull up on the bottom of the screen any streets or buildings which start with the letters you entered. Once you have located the street you want, enter the sequence # and it will appear in the street name field. If the street you are looking for does not show up you can enter the street in its entirety and enter “XXX” in the municipality field. (See image below)(Out Of Town Deliveries)Enter the street Name in full, including whether it is a street, road, avenue, etc. Press enter until you reach the Municipality field. Press period (.) then enter; this will pull up on the bottom of the screen a field asking for the city. Enter the city you are sending to and press enter. Once you have located the city you want enter the sequence # and that city will appear in the Municipality field.(see image below). (For out of town pick ups please call our office).
- Enter #/Suite
- Special Instructions – You have 4 lines to enter any instructions. If you have none to enter press PF4 or F4 (depending on your keyboard) and it will advance you to the service field.
- Service – Enter one of the following #’s depending on your requirement or enter PF1 or F1(depending on your keyboard) and select the menu # for the service you require.0 – REGULAR 4 – DISCOUNT RETURN SERVICE (For Roundtrips)1 – RUSH 5 – FLAT RATE ECONOMY2 – NIGHT CALL / WEEKEND 6 – HOLIDAY3 – RUSH NIGHT CALL 7 – EXCLUSIVE
- Pieces – Enter # of pieces (1 is the default)
- Weight – Enter weight in pounds (1 lb. is the default)
- Return – Yes (Y) or No (N)
- Vehicle – (T)ruck (W)agon (C)ar (?)-OtherLeave it as a ? unless you require a Car or Truck or Wagon.
- Depending on your keyboard press the function keys which run across the top of your keyboard.PF1 or F1 to accept the order;
PF2 or F2 to go back and modify the order;
PF3 or F3 to cancel the order.REMEMBER: If at any time while you are placing an order you want to go backwards, use the Up Arrow key. If you want to advance, press enter.
DEFERRING AN ORDER
If you want to place an order for pick up or delivery at a later time follow the above instructions and in Special Instructions enter:
%d pick up at 3:00 pm (or whatever time you require the pickup).
It is important to use the small “d” and a space after the “d” for the message.
ADDRESS ENTRY
Address Entry is used to add addresses in your Rolodex.
To get to Address Entry press the Up Arrow key until you get to the menu selection:
Press 5 (enter) for Address Entry.
The screen will look like this:
Type your information and press enter to move to the next field.
The above options are defined as:
- Customer Number: self explanatory.
- Point Code: is alphanumeric- you may want to use a file number or first letters of the client name, but something must be put in Point Code.At the bottom of the screen it will ask Creation (Y,N)?Type Y (enter).
- Name: Company name.
- Civic Number: of the street.
- Street Name: Enter the first four or five letters of the street, then let the “Street lookup” work for you by pressing PF2 or F2 (depending on your keyboard). Enter the sequence # of the street you require and it will complete the rest of the information in this section. For Out Of Town addresses, enter the name of the street completely including the street, road, avenue, etc. Press enter until the Municipality field. Enter period (.) enter, and the name of the city (enter). E nter the sequence # of the city you request.
- Room /Suite: if applicable.
- Contact: name of person at that company.
- Telephone: number.(Press enter at the end of every selection.)
After you have filled in each of the above fields you will have created a file for this client and it is complete. The bottom of the screen says “Field”. If you need to change any information, then enter the filed you are changing, i.e.. 4 (e nter) to change Civic number. Otherwise, press the Up Arrow and the screen will clear to read the Point Code fields only. You now have that information stored and can retrieve it in Order Entry mode. The memory for your client list is massive so do not worry about not having enough space.
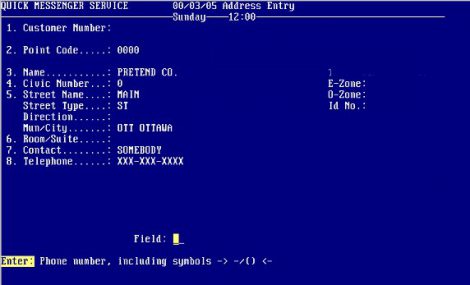
This “Pretend Co.” has now been added to the Rolodex. The Field option will allow you to go back and make changes to the information.
The Rolodex is used to replace the need to look up client addresses. When you are placing an order and get to the “Name” field, the prompt at the bottom of the screen will indicate PF1 or F1 (depending on your keyboard) for Cust omer Accounts Inquiry and Selection. You can now access your address file by Name, Street, or Point Code. The full name and address will now appear in the “TO” field. Continue to place your order as usual.
EXITING THE SYSTEM
Use the Up Arrow key to backup out of the Order Entry screen until you see a “Logout” menu selection. Press 7 to Logout.
You will then see the following message appear:
Press “X” here if you want to close down the program completely or stay parked here until your ready to place another order or do an inquiry. Just minimize the program until your ready to get back on the system.
|